Of the many ways of exchanging files between 2 systems, one of the most comfortable options is to share files between 2 systems connected to the same network. However, a few users have reported the following error while trying to share resources:
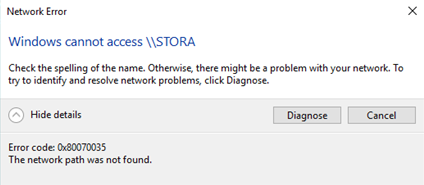
windows 10 Error code 0x80070035 The network path was not found.
Cause
One known reason for this error is when antivirus software or the Windows Defender Firewall block system resources. However, the causes may be many, thus we would try to troubleshoot the issue sequentially.
Fix 1 – Disable The Antivirus And Firewall Temporarily
The procedure to disable the antivirus software varies with the brand of the antivirus application. In general, we open the antivirus applicat
ion and pause the process. We could also disable it temporarily.
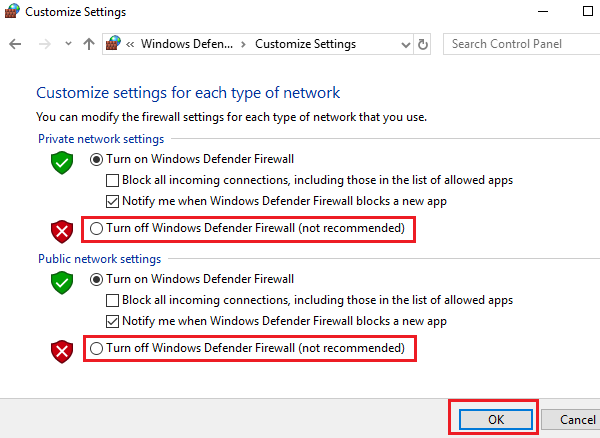
To disable the Windows Defender Firewall, the procedure is as follows:
1] Press Win + R to open the Run window and type the command control panel. Press Enter to open the Control Panel window.
2] Among the list of options, click and open Windows Defender Firewall.
3] On the list on the left-hand side, click on Turn Windows Defender Firewall on or off.

4] For both Private and Public network settings, select the radio button at Turn off Windows Defender Firewall (not recommended).
5] Click on OK to save the settings and restart the system. Check if it helps with the issue or not.
Fix 2 – Reinstall Network Adapters Including The Hidden Adapters
Connect your computer to the internet hard-wired.
1] Press Win + R to open the Run window and type the command devmgmt.msc. Press Enter to open the Device Manager.
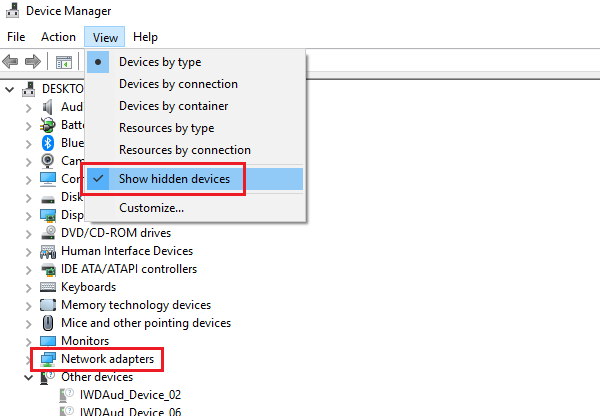
2] Click on the View tab in the Device Manager window and check Show hidden devices.
3] Now when you expand the list of Network adapters, the hidden adapters would show with light-colored translucent icons.
4] Right-click on all the drivers and uninstall them.
5] Reboot the system and check if it resolves the issue.
Fix 3 – Enable NetBIOS Over TCP/IP
1] Press Win + R to open the Run window and type the command ncpa.cpl. Press Enter to open the WiFiproperties.
2] Right-click on your WiFi network and select Properties.
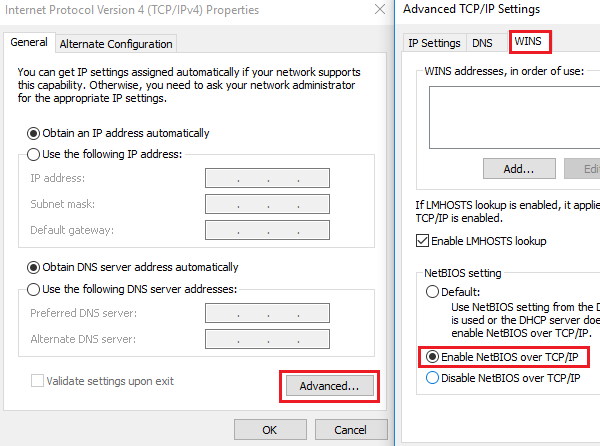
3] Double-click on Internet Protocol Version 4 to open its properties.

4] Click on Advanced and go to the WINS tab.
5] In the NetBIOS setting column, choose the radio button at “Enable NetBIOS over TCP/IP.”
6] Click on OK to save the settings and then restart the system.
Fix 4 – Turn ON Network Discovery
1] Press Win + R to open the Run window and then type the command control panel. Hit Enter to open the Control Panel window.
2]Click on Network and Sharing Center to Open the Network and Sharing Center.
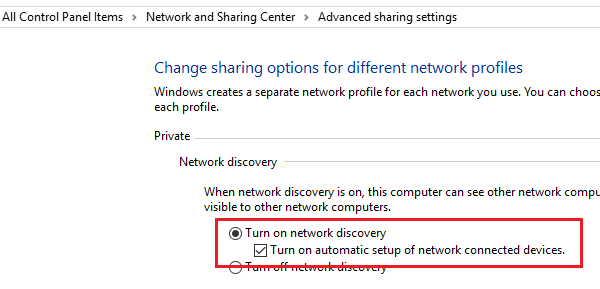
3] From the menu on the left-hand side, choose Change Advanced Sharing settings.
4] Shift the radio button to the option Turn on network discovery and check the box which says Turn on automatic setup of network connected devices.
5] Reboot your system and check if it helps with the issue.
Fix 5 – Delete All Windows Credentials
1] Press Win + R to open the Run window and type the command control panel. Press Enter to open the Control Panel window.
2] Select the Credential Manager from the options.
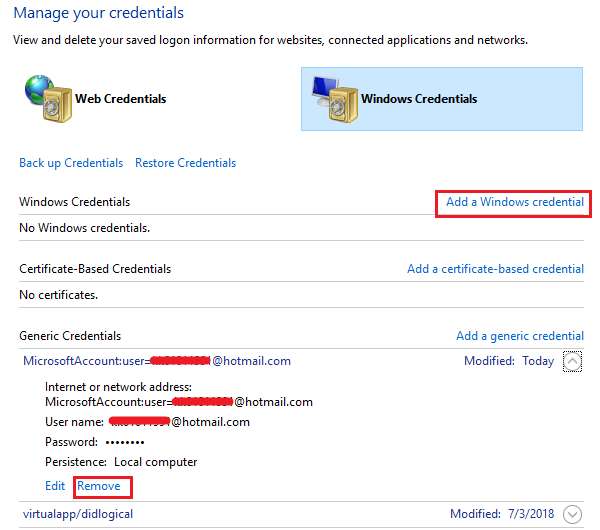
3] In the Windows Credential section, remove all the credentials and restart the system.
4] Enter all Windows credentials wherever necessary again.
5] Alternatively, you could click on Add a Windows Credential on the same page and add the credentials manually.
Fix 6 – Modify The Network Security Settings
1] Press Win + R to open the Run window and type the command secpol.msc. Press Enter to open the Local Security Policy window.
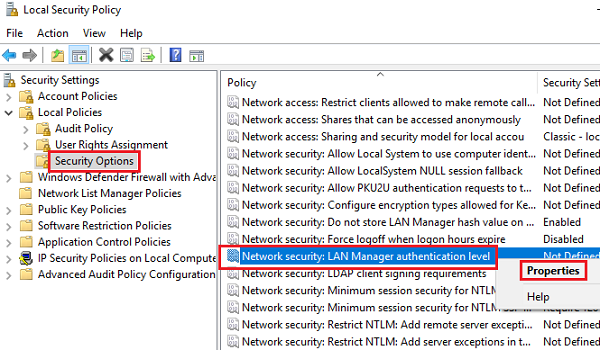
2] Navigate to the path Local Policies >> Security Options.
3] On the right-pane, double-click and open the properties for Network security: LAN Manager authentication level.
4] From the drop-down menu, select Send LM & NTLM-use NTLMv2 session security if negotiated.
Fix 7 – Using Command Prompt
1] Press Win + R to open the Run window and type the command cmd. Press Enter to open the Command Prompt window.
2] Type the following command one-by-one and press Enter:
ipconfig /release

ipconfig /flushdns

ipconfig /renew
Reboot the system and check it it helps. If not, try the following command on Command Prompt:
ipconfig /flushdns

nbtstat –r

netsh int ip reset

netsh winsock reset
Restart the system and check if this resolves the issue.
Hope it helps!
Call On Our Technical Support Phone Number for Errorcode Expert  USA +1 (800) 808-1781 Right Now to Get Instant Help
 USA +1 (800) 808-1781 Right Now to Get Instant Help
No comments:
Post a Comment